

Windows: How Flashing Works
WINDOWS — PART 3B in AJO’s REBUILDING STRONGER SMARTER SERIES
Part 3B: WINDOWS: HOW FLASHING WORKS (and why it’s important!)

Our series of "Rebuilding Stronger Smarter" focuses on the "smarter" aspects of architecture and construction.
Series 3B continues the discussion about the importance of windows, by talking about how window flashing is (usually) a hidden component that is CRITICAL to the longevity of your window and ultimately the building as a whole.
Flashing is installed before the window is placed into the wall, and if missing or done improperly, it will certainly lead to a window's failure to protect the inside of your building.
Check out the rest of Series 3B for more information!

Two Types of Flashing
Most window flashing comes in two varieties: tape (or peel-and-stick) and liquid-applied.
While they will both work, they each have their strengths and weaknesses. Liquid applied flashing will give a tighter and more uniform seal to the window opening, but many contractors will have more experience installing the more traditional tape flashing.

Liquid Flashing: Step 1 of 4
How to Install Liquid Window Flashing
Step 1. Prepare the window opening.
Use 2x4s, trimmed to size to frame the inside of your opening, making sure to align to the interior side of the wall.
This will give the window a visual shadow when it's finished, as well as provide a bit more overhang from the outside for added protection from rain.
Liquid Flashing: Step 2 of 4
How to Install Liquid Window Flashing
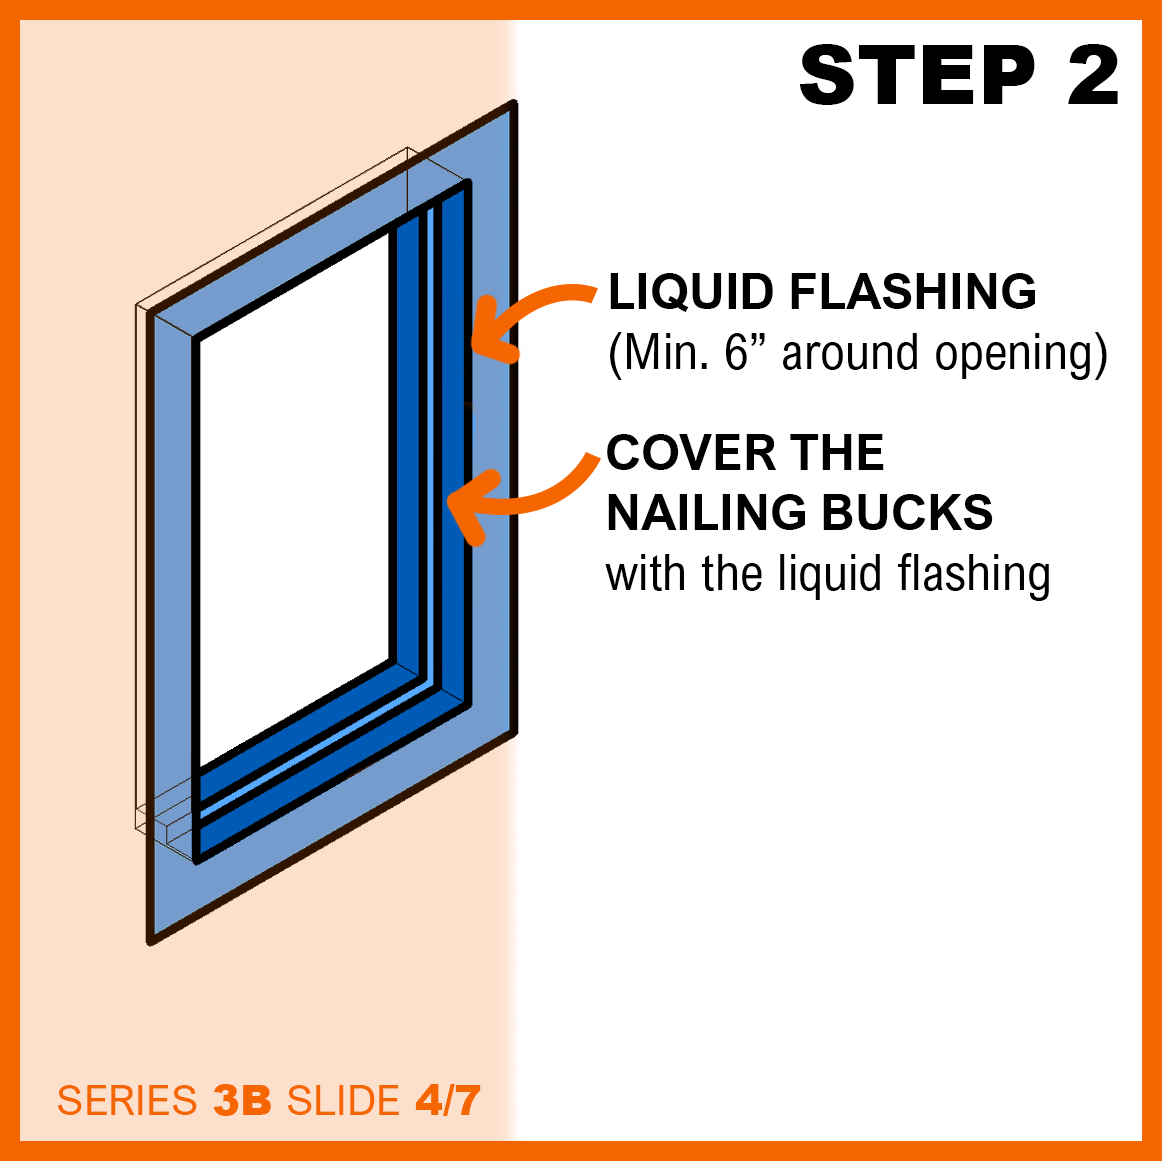
Step 2. Paint the liquid flashing around the whole opening according to the manufacturer's instructions.
Ensure that the liquid covers the 2x4 wood nailing bucks, and laps over the exterior building wall at least 6 inches on all sides.

Liquid Flashing: Step 3 of 4
How to Install Liquid Window Flashing
Step 3. Install the window on top of your wood 2x4 bucks, and use caulk sealant around the edges, according to the manufacturer's instructions.
DON'T seal the bottom of the window on the outside, because that's where any trapped water will escape to the exterior of the building.

Liquid Flashing: Step 4 of 4
How to Install Liquid Window Flashing
Step 4. Install your window sill and trims, making sure to use proper drip edges to keep water away from the window.
Use more caulk around the edges of the window to conceal the joints between the window and its trim.
What if my installation is different?
When dealing with your existing windows, remember to:
INSPECT the window frame for damage, missing caulk, and spalling or bubbled window sills.
REPAIR caulk and exposed damage to surfaces.
REPLACE broken or worn out windows. Aluminum impact-rated windows are best, but vinyl replacement windows will also work!